What Course Studio is for, and how to get a finished course out of it — written screen by screen, in the order you will actually meet them.
Three things you can make
Interactive module
Screens the learner clicks through, with questions they must answer before they can go on.
Use it for
POSH, data privacy, safety — anything that must be signed off
Induction where you need proof they took it in
A policy that changed and has to be re-certified
Nine kinds of question — choose, sort, match, drag, label a photo
Every practice screen gated; the score goes back to the LMS
SCORMsingle HTML file
Narrated video
Pictures, a real voice and captions, rendered to a film. It can pose a question and reveal the answer.
Use it for
Email etiquette, interviews, feedback — soft skills people finish
A client's product deck turned into something watchable
A five-minute explainer instead of a forty-slide PDF
Pictures drawn for each scene; named characters keep one face throughout
Timing comes from the recording, so a re-recorded line re-times itself
MP4 + SRTSCORM
Avatar video
The same video, with a lifelike presenter on screen explaining it — in your voice and your language.
Use it for
Day one, where a face lands better than a slide
The same course in Hindi, Hinglish and English — no studio
Product and sales briefings that must look presented
Over nine thousand presenters to choose from
Lip-synced to your own recording, not a robot reading the text
MP4 + SRTSCORM
All three share one brand kit — your logo, your colours, your narrator — and all three can start from a script, a PowerPoint or a one-line description.
What this is for
Course Studio turns a script, a deck or a rough brief into a finished course — a narrated video, or an interactive module a learner clicks through and is scored on — and packages it for Moodle or any other LMS.
The problem it was built for
Making e-learning the usual way is not hard so much as it is slow in the places that repeat. Four things cost most of the time, and none of them are the teaching:
Narration is a studio booking. Record it, edit it, name the files, drop them in. Then the client changes one sentence on screen 9 and the whole loop runs again for one line.
Timing rots the moment the words change. A re-recorded clip half a second longer pushes every reveal after it off the words it belongs to, and the only way to find out is to watch all fifteen minutes.
The client's deck never quite becomes a course. Someone rebuilds forty slides by hand, and the price table that mattered gets flattened into a picture of a price table.
A second language is a second build. Same structure, same pictures, all the work again.
The Studio's answer to all four is the same one: nothing is typed twice and no duration is ever typed at all. A scene lasts exactly as long as its recording, so re-recording one line re-times that scene and everything after it, by itself. That is the whole reason a change costs minutes here rather than an afternoon.
What you put in, and what comes out
You bring
The Studio adds
You get
A script, a PowerPoint, a Word scene table, or just a description of the topic and the audience.
Pictures, narration in a real voice, an on-screen presenter, captions, the layouts, the quiz screens, and the packaging.
A SCORM package for Moodle, an MP4 with an SRT, or a single HTML file.
What it actually does for you
Writes the first draft from a brief, or keeps your words exactly as written if you have them.
Draws the pictures — and draws your named characters against one reference sheet, so the same person has the same face on screen 3 and screen 9.
Records the narration in a natural voice, and re-times every reveal to it automatically.
Puts a presenter on screen — a lifelike avatar, lip-synced to that same recording.
Keeps the client's deck intact when that matters: their text, pictures, tables and colours, with the table still live text rather than a screenshot.
Makes the questions interactive — nine kinds, gated so the learner has to answer, scored back to the LMS question by question.
Holds the brand — logo, colours and narrator voice set once per client, used by everything new.
Writes the captions and packages SCORM 1.2 with scoring, resume and time spent.
Hinglish and English are offered when you start; the voice is multilingual, so a script written in another language is narrated in it.
What people use it for
The job
What to build
Why that one
Compliance that has to be proved — POSH, data handling, safety
Interactive module
Gated questions and a pass mark. The LMS gets a score per person, which is the only thing an auditor accepts.
Induction and onboarding
Avatar video, then a short module
A face saying it is warmer than slides for a first day; the module proves they took it in.
A policy or process just changed
Short refresher module
Six screens, two practice questions. Built in a morning, and cheap to re-cut when the policy moves again.
Product or sales training
Video from the product deck
Keep the deck — the real product shots, the real price table — and add narration and a presenter over it.
Short, watchable, shareable. People finish a seven-minute video they would not finish as a deck.
The client sent a deck and wants "a course"
Import it, then choose the fidelity
Three settings decide how much of their slide survives — from untouched to fully rewritten.
The same course in another language
Copy it and replace the narration
Pictures, layouts and timing are rebuilt from the new recording, so you translate words, not a build.
Something you published years ago
Bring in the SCORM zip
It is taken apart into an editable kit — images, narration, cue timing — instead of rebuilt from memory.
What it does not do
Worth knowing before you promise something to a client.
A video is not clickable. An MP4 can pose a question and reveal the answer, but nobody answers it and nothing is scored. If it has to be answered, it is a module — see Questions: which kind you need.
No real people on camera. The presenter is a lifelike avatar. If the client wants their own MD on screen, this is not the tool for that part.
SCORM 1.2 only — not SCORM 2004, not xAPI. Fine for Moodle and nearly every corporate LMS; check first if someone has asked for xAPI by name.
No branching scenarios. Every learner takes the same path through the screens.
It drafts; you edit. What the AI writes is a first draft against a fixed structure, not something to publish unread. The facts in it are your responsibility, and on anything regulated that matters.
Generated pictures are generated. They are good enough to carry a scene and not a substitute for a real photograph of the client's own factory, product or people — you can upload those instead, per scene.
Signing in
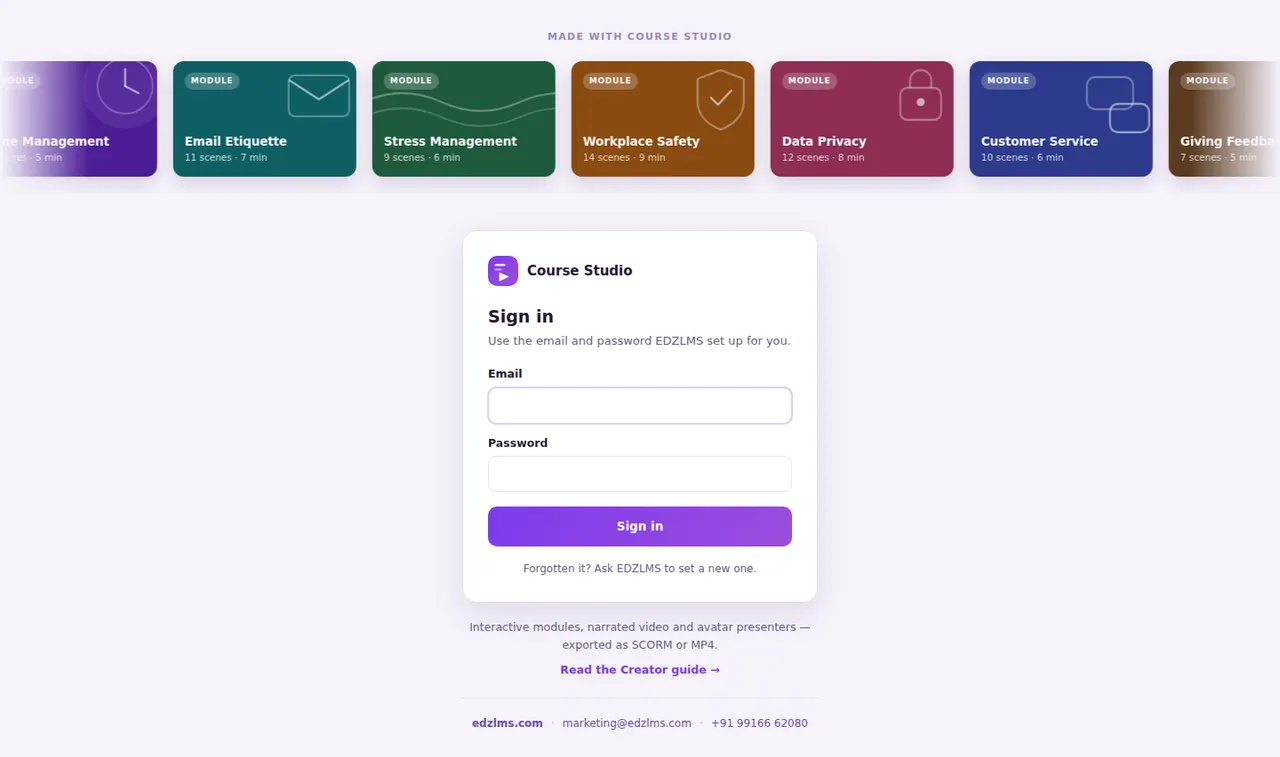
Course Studio is at studio.edzlms.com. EDZLMS sets up your login and gives you a temporary password.
The sign-in page. The guide you are reading is linked from it, so you can read it before you have an account.
Sign in with the email and the temporary password you were given.
Choose your own password. You are asked for one the first time, and the temporary one stops working.
Check the top-right strip. It shows your name and, beside it, which client's shelf you are looking at. Everything you make lands on that shelf.
Forgotten the password? There is no self-service reset — ask EDZLMS and a new temporary one is made for you. This is deliberate: the Studio holds client work and sends no email, so there is no reset link for anyone to intercept.
Sign out is at the far right of the top bar. On a shared machine, use it — a session outlives a closed tab.
Modules and videos
Two kinds of thing, from the same brand kit and the same shelf of content. This is the choice every job starts with.
Interactive module
Video
Screens with clicks, reveals, drag-and-drop and narration. The learner answers questions and is scored. Published as SCORM, or as a single HTML file. This is the Articulate-style output.
A rendered MP4 with AI pictures, recorded narration and captions — optionally with a lifelike avatar presenting it. It can pose questions, but nothing is clicked or scored. Published as MP4 + SRT, or as SCORM.
If the learner has to pass something, you want a module. If they have to watch something, you want a video — see Questions: which kind you need.
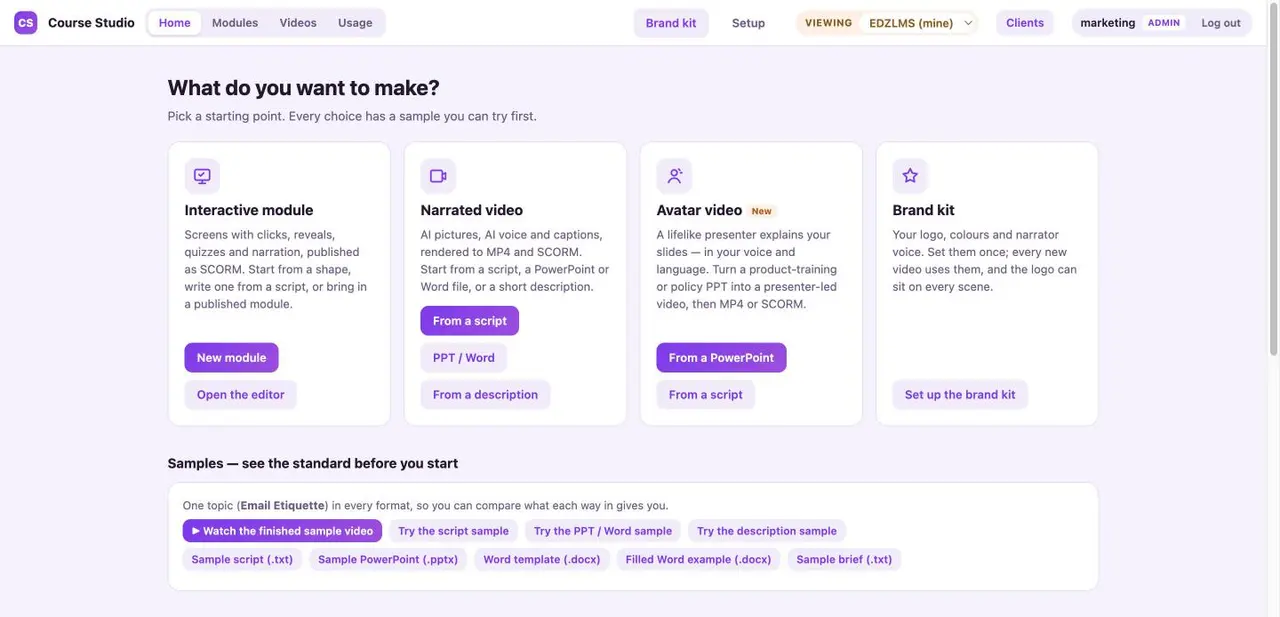
The home page is the fork. Each card has a sample you can open before committing to anything.
Home. Four starting points, and a samples row underneath — one topic (Email Etiquette) in every format, so you can see what each way in actually gives you before you write anything.
Try the sample first.Watch the finished sample video takes about four minutes and will save you a wrong turn. The sample script, PowerPoint and Word template are downloadable from the same row — open one and you will see exactly what the Studio expects a script to look like.
Set the brand kit first
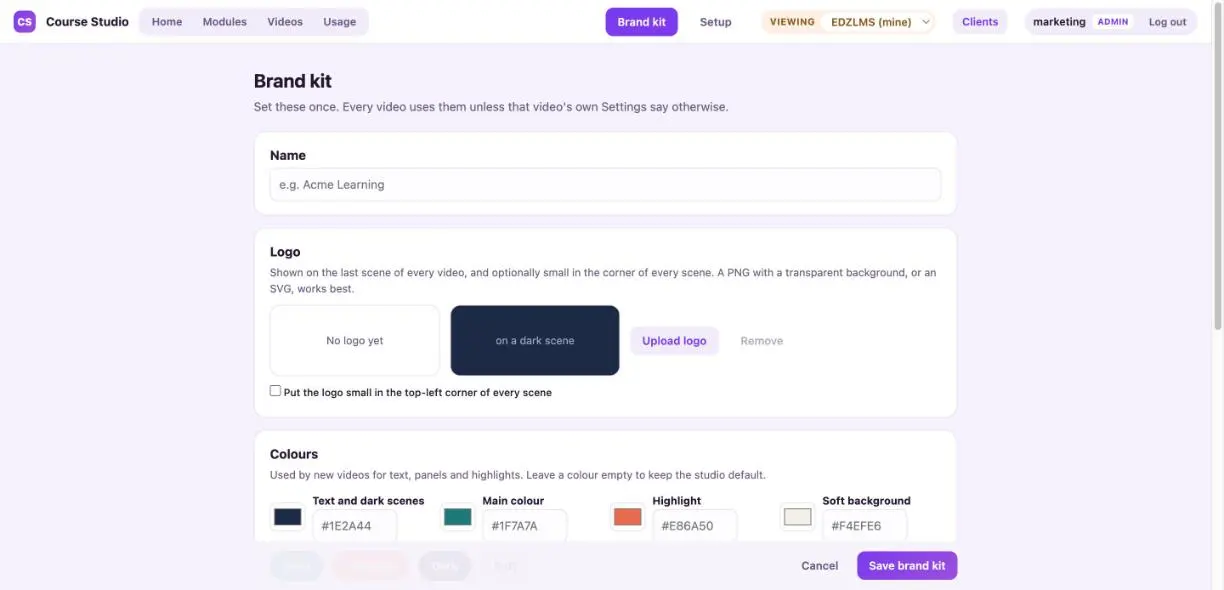
Everything new uses the brand kit unless that one video overrides it. Setting it once at the start is five minutes; fixing it after fifteen videos is not. Brand kit is in the top bar of every screen.
Name, logo and colours. The logo is previewed on both a light and a dark scene, because it appears on both.
Logo. A PNG with a transparent background, or an SVG. It is shown on the last scene of every video, and the title card uses it too. Tick Put the logo small in the top-left corner of every scene if the client wants it throughout.
Colours. Four: text and dark scenes, main colour, highlight, soft background. Leave one empty to keep the Studio default. Interactive modules take their colours from their own Style → Look & brand step instead.
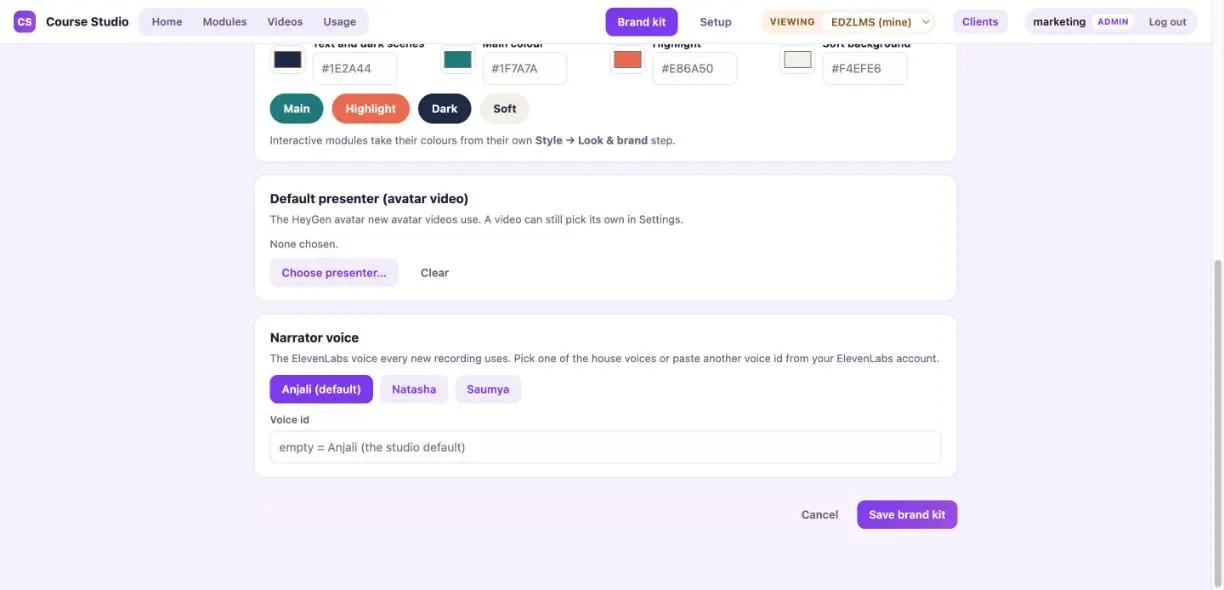
The two halves of a presenter, one above the other: the avatar's face and the voice it will speak in.
Default presenter. The HeyGen avatar new avatar videos start with. Any one video can still pick its own.
Narrator voice. Three house voices — Anjali (the default), Natasha, Saumya — or paste any voice id from your own ElevenLabs account.
All three house voices are female. If you choose a male presenter and leave the voice alone, the finished clips will show a man speaking in a woman's voice. The Studio now warns you on this page and refuses to make the clips, but it is far easier to set both correctly here. See Avatar and voice must match.
Start a video
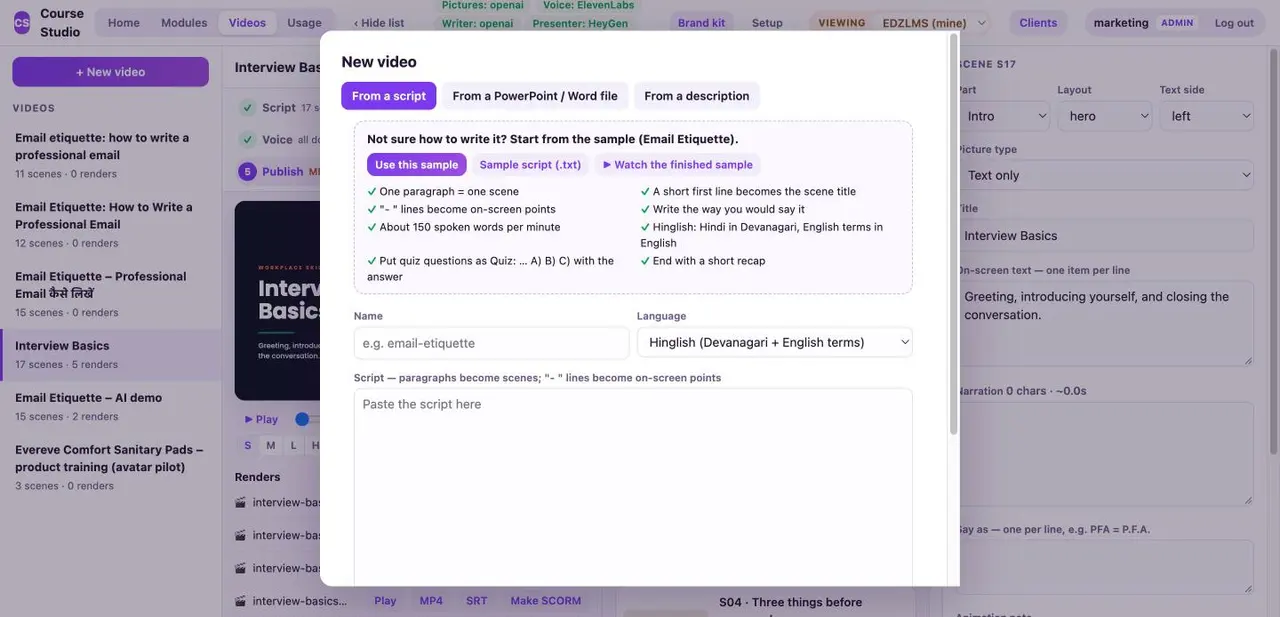
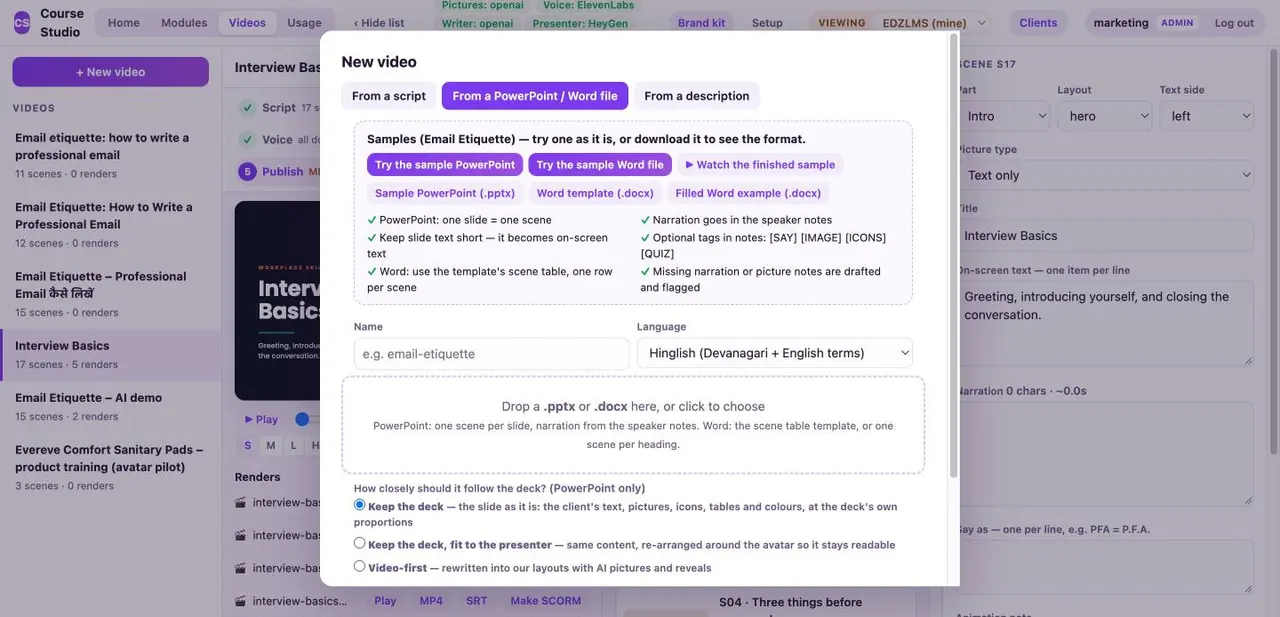
Videos in the top bar, then + New video. Three ways in, as three tabs.
From a script. The checklist in the panel is the whole format — there is nothing else to learn.
Way in
Use it when
What you get
From a script
You, or the client, have written the words.
Your words, scene for scene. Nothing is invented.
From a PowerPoint / Word file
The client sent a deck or a filled scene table.
Their slides, as faithfully as you ask for. See From a deck.
From a description
You have a topic and an audience, nothing written.
A full draft script from the AI writer, to edit.
Writing a script the Studio reads well
One paragraph becomes one scene. A short first line becomes that scene's title.
A line starting - becomes an on-screen point.
About 150 spoken words per minute — so roughly 150 words per minute of finished video.
Write it the way you would say it. It is going to be read aloud.
A quiz is Quiz: … A) B) C) with the answer.
End with a short recap.
Language offers Hinglish (Devanagari with English terms), which is what most of the EDZLMS catalogue uses: Hindi narration, English for the technical words.
The editor
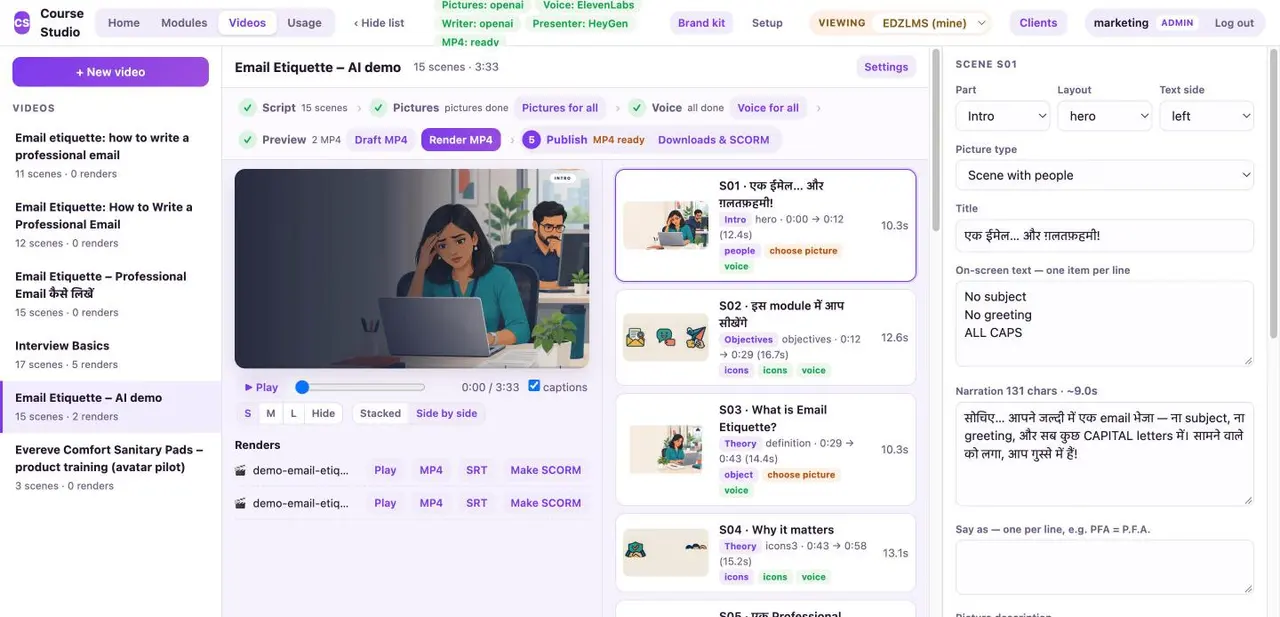
One workspace, not a wizard. The numbered rail across the top is the order of work and also the controls — the buttons sit in the step they belong to, and a step shows what is still missing.
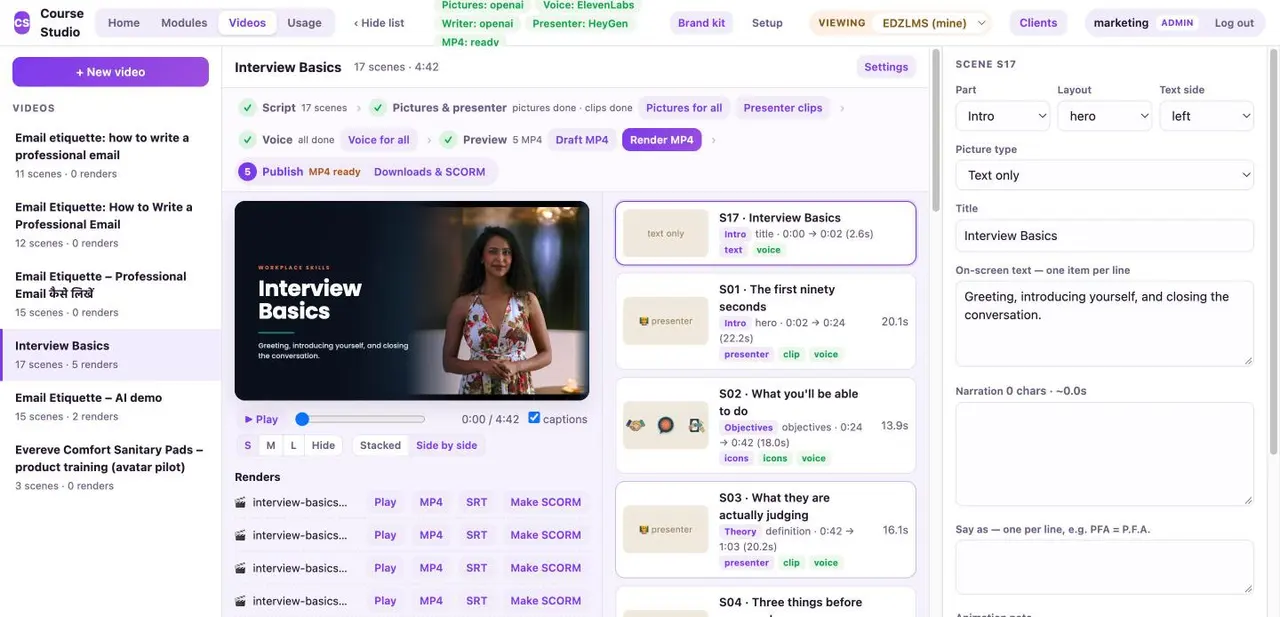
Left: every video for this client. Middle: the rail, the preview and the scene list. Right: the scene you have selected.
You can move between steps freely and come back. Nothing is locked. The one real order is that voice must be recorded before presenter clips are made, because the avatar lip-syncs to your recording.
Across the very top, in green, the Studio tells you which providers it has: pictures, voice, writer, presenter, and whether MP4 rendering is possible on this machine.
1 · Script
Click any scene in the middle list; the right-hand panel is that scene.
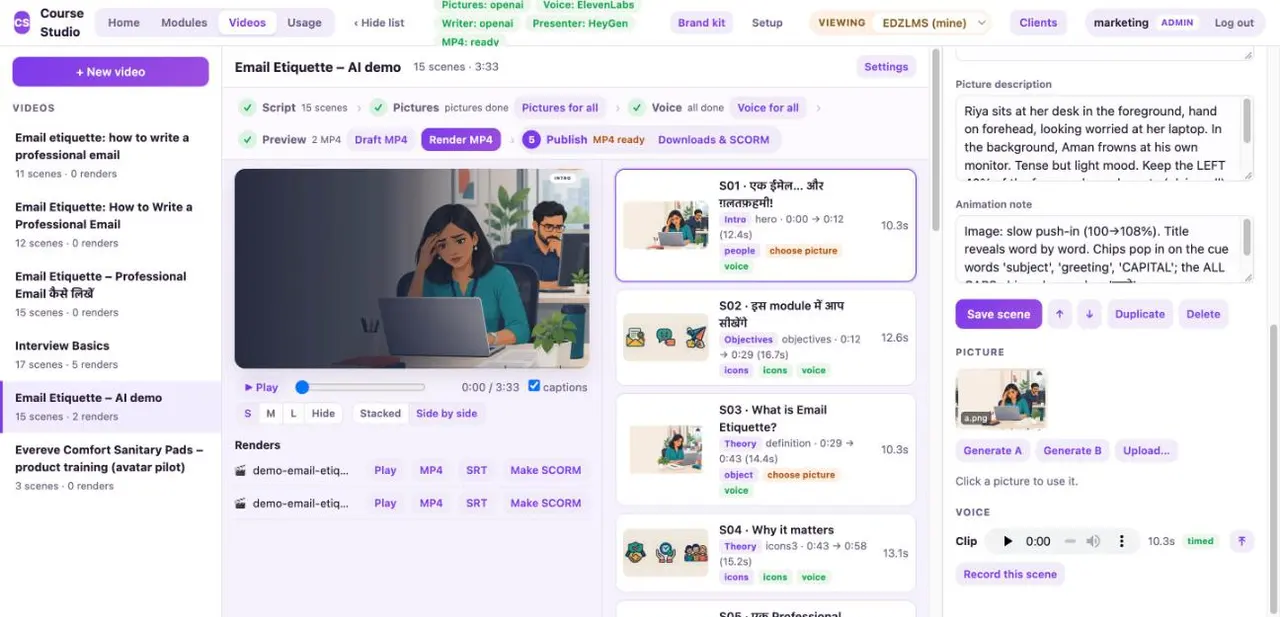
One scene. The character count under the narration is the estimated length — about 14.5 characters a second.
Field
What it does
Part
The section this scene belongs to (Intro, Theory, Explain…). The first scene of a new part gets a full-screen section card. Keep consecutive scenes in the same part unless you want that card.
Layout
How the scene is arranged: hero, objectives, definition, icons3, anatomy, compare, steps, bullets, email, table, quiz, summary, products, end, plus title for the opening card and deck for a kept slide.
Text side
Which side the words sit on: left, right, top or center.
Picture type
Scene with people, Object picture, Icons on the items, Text only, or Presenter (avatar video).
On-screen text
One item per line. Some layouts want a particular shape — compare and table take ✗ bad / ✓ good lines, products takes NAME | caption.
Narration
The words that get spoken. The scene's length is computed from the recording, so you never set a duration anywhere.
Say as
Pronunciation fixes, one per line: PFA = P.F.A. Without this the voice reads initialisms as words.
Picture description
What the AI should draw for this scene.
Animation note
A note to yourself about the reveal. It does not drive anything.
Under the fields: Save scene, and ↑ ↓ DuplicateDelete to reorder.
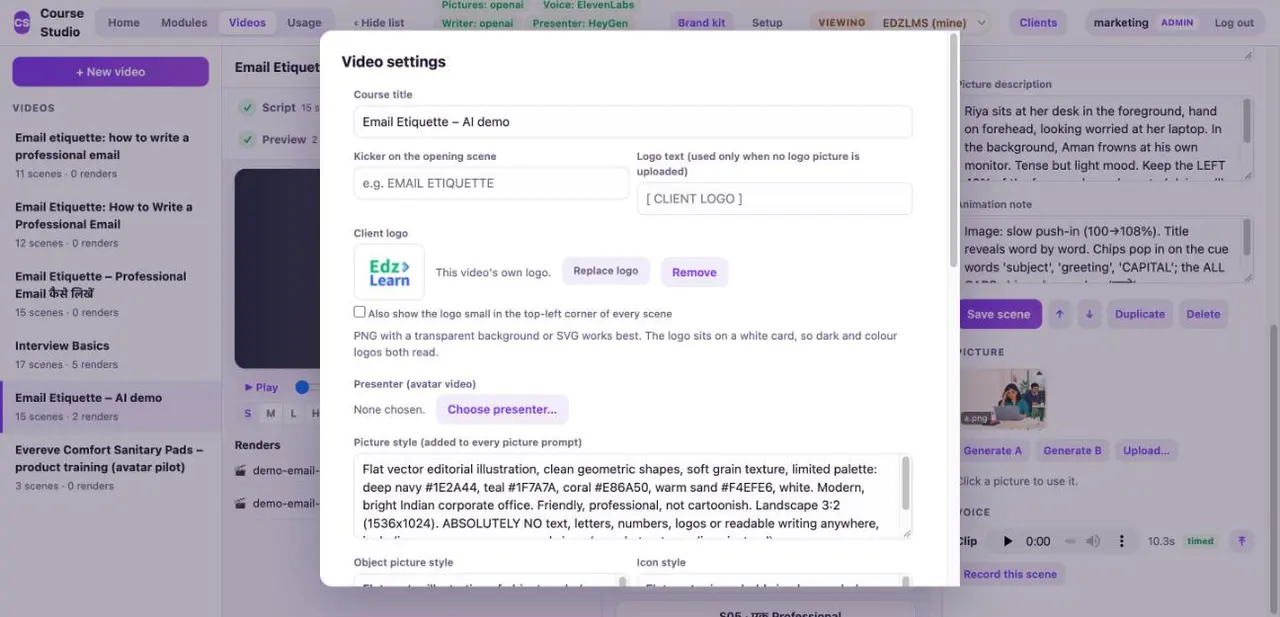
Settings — the things that apply to the whole video
Settings, top right of the editor.
Course title and Kicker on the opening scene — what the title card says.
Client logo — overrides the brand kit for this one video.
Picture style, Object picture style, Icon style — appended to every picture prompt, which is how a whole video ends up looking like one piece of work rather than fifteen stock images.
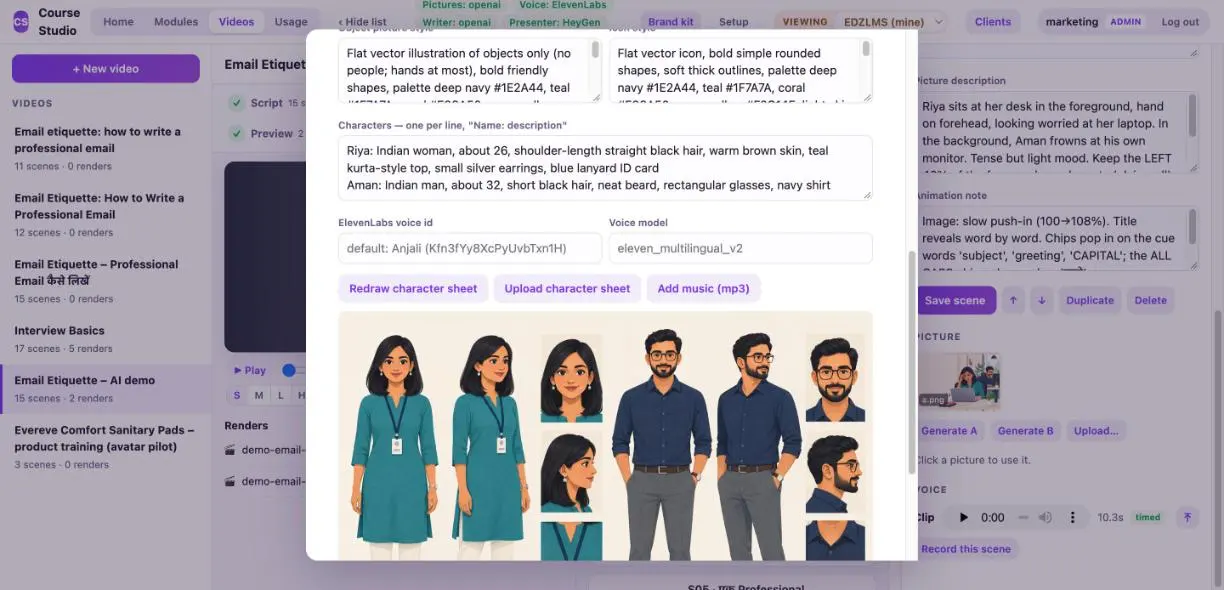
Characters — named people, one per line as Name: description.
ElevenLabs voice id and Voice model — override the brand kit voice here.
Add music — an optional bed under the narration.
The character sheet. Named characters are drawn once from several angles, and every later picture is generated against that sheet — which is what stops the same person changing face between scene 3 and scene 9.
2 · Pictures
Pictures for all generates picture A for every scene that has none, and every missing icon. Per scene, the picture row offers Generate A, Generate B and Upload…; generate both and pick, or drop in the client's own image.
Pictures cost money per image and the count is metered. Write the picture description before you press Pictures for all, rather than generating the whole set twice.
3 · Voice
Voice for all records every scene. Per scene, Record this scene.
Timing is taken from the recording, so re-recording a scene re-times its reveals automatically. You never adjust a cue by hand.
A … in the narration is a real pause — on a quiz scene it is the gap before the answer appears.
Write A.I., not AI, or the voice says the word "ay".
Long numbers get read digit by digit. Spell them how they should sound.
Record the voice before making presenter clips. HeyGen lip-syncs the avatar to your recording. Change the narration afterwards and the clip is marked stale — make it again, or the mouth will not match the words.
4 · Preview
The player in the middle plays the whole video from the browser, before anything is rendered — with captions, at S / M / L size, stacked or side by side. Use it for pacing and for reading the on-screen text; use a render for the final look.
Draft MP4 — 12 fps, lower quality. Minutes, not tens of minutes. This is the one to send for sign-off on content.
Render MP4 — 30 fps, full quality. This is the deliverable.
Both report warnings when they finish: missing pictures, placeholder narration, stale presenter clips. Read them — a render will happily produce a perfectly good MP4 of a video with silent placeholder audio in scene 7.
5 · Publish
Every render is kept. Each row offers Play, MP4, SRT and Make SCORM.
MP4 — the video itself.
SRT — the captions, as a separate file for YouTube or an LMS player.
Make SCORM — a zip with the manifest, the video and a WebVTT caption track, ready to upload to Moodle as a SCORM package.
Old renders are not deleted. The newest is at the top. If you are sending a file to a client, check the date on the row before you download it.
Questions: which kind you need
Both rails can ask the learner a question, but they are not the same thing, and picking the wrong one is the commonest planning mistake.
Quiz scene in a video
Question screen in a module
What the learner does
Watches. Thinks during the pause.
Clicks, drags, sorts, answers. Cannot continue until they do.
Is it scored?
No. Nothing is recorded.
Yes — the score goes to the LMS, question by question.
Output
MP4, or SCORM wrapping the MP4.
SCORM, or a single HTML file.
Choose it when
You want people to think before you tell them the answer.
You need proof they can do it — compliance, certification, anything with a pass mark.
A video cannot be clicked. A rendered MP4 is a picture of a quiz, not a quiz. If someone has asked for "an interactive video with questions" and means the learner must answer and be marked, what they need is an interactive module.
Quiz scenes in a video
Set a scene's Layout to quiz. The panel then asks for a Question, Options (one per line) and the Answer.
In the finished video the question and its options appear, the narration pauses, and then the right option lights up while the wrong ones fade. The pause is not a fixed length — it comes from your narration.
Put a … in the narration where the pause goes. That is what the gap is made of. Without it the answer reveals itself the moment the question appears, which is the one way to make a quiz scene pointless. The validator warns you, but it cannot write the pause for you.
A worked example, as you would type it into the scene:
Question
A client writes "ASAP" in the subject line. What is the problem?
Options
It is rude It says nothing about what is urgent It is too short
Answer
2
Narration
So what is wrong with this subject line? Have a think. … The problem is that it says nothing about what is actually urgent.
Three or four options is the useful range. Keep them short — they are read on screen, in a few seconds, often on a phone.
Questions a learner answers
This is the interactive rail. Build it from the module shelf; every shape already has its question screens laid out in the right places, and you replace the words.
Nine kinds of question
Pattern
What the learner does
Single-choice
One question, one answer, feedback in a modal. Only the first attempt is scored.
Multi-response
"Select all that apply", with a plausible wrong option among them.
Scenario
A character puts the situation to the learner in their own words, choices over the picture. Warmer than a question on a white screen.
Sort into bins
Two or more categories to drop items into. Each verdict explains itself.
Match
Pair each item on the left with its example on the right.
Put it in order
Shuffled steps into connected boxes. For any process where the order is the point.
Label the picture
Drop zones placed on a photograph — the target is a place in the image, not a category.
Orientation puzzle
Artwork shown wrong; rotate or flip it until it is right, then submit.
Drag & drop that teaches
Every correct drop opens a card that teaches the concept — not just a tick. The one worth reaching for when the point is understanding rather than checking.
Gates and levels
Every practice screen is gated. The learner cannot move on until they have answered. That is what makes it practice rather than a slideshow with a question on it.
L1 / L2 / L3 is the difficulty of each screen — recall, apply, judge. The shape holds roughly 40 / 30 / 30, and the chips in the screens list show you the mix you actually have.
Teach first. Every shape pairs a teaching screen with the practice that follows it. Do not write a question about something the module has not yet taught.
What reaches Moodle
A published module is SCORM 1.2 and reports, with no extra work from you:
A score out of 100, and passed or failed against a 70% mastery mark.
Each question separately — what was asked, what the learner chose, and whether it was right.
Completion, time spent, and where they got to, so a learner who closes the tab resumes on the same screen.
Feedback is where a module earns its keep. "Not quite" teaches nobody. Write the wrong-answer feedback as the sentence you would actually say — "Not this one. Re-read the rule of thumb on the last screen." — because for the learner who got it wrong, that is the whole lesson.
Choose a presenter
An avatar video is an ordinary video where some scenes have Picture type: Presenter. Set the avatar in Settings → Presenter, or for all new videos in the brand kit.
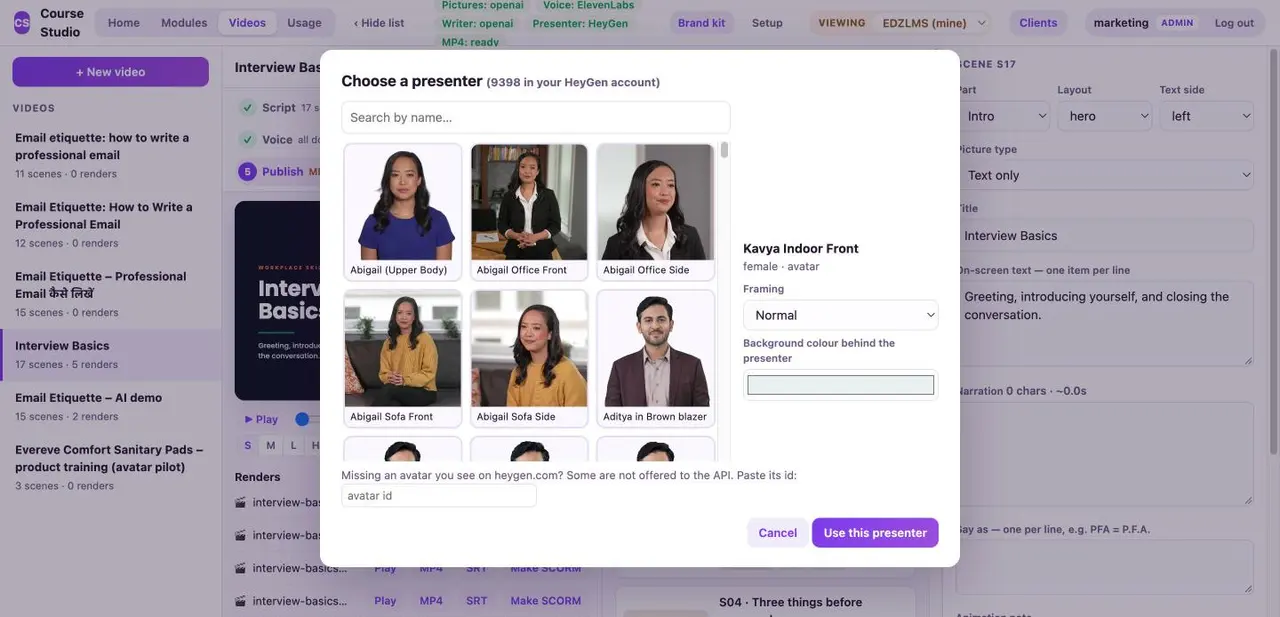
The picker. There are over nine thousand avatars in the account, so use the search box. The panel on the right names the avatar's gender — read it.
Framing — Normal, Close up, or Circle.
Background colour behind the presenter — set it to something that sits with the scene, not against it.
An avatar you can see on heygen.com but not here is not offered to the API. Paste its id in the box at the bottom.
Per scene, Presenter position decides where they stand: full screen with the text beside, in a rounded box beside the text, or small in a corner circle.
The first time the picker is opened after a restart the list can take about a minute to arrive from HeyGen. The Studio fetches it in the background at startup, so in practice it is usually instant — if it says the list is still coming, it is, and it will fill itself in.
Avatar and voice must match
This is the mistake worth knowing about before you make it.
HeyGen does not choose a voice. It lip-syncs the face you picked to the audio you hand it — your ElevenLabs recording. So the two halves of one presenter are chosen in two different places: the avatar in Settings, the voice in the brand kit. Nothing stops you pairing a man's face with a woman's voice, and the result is not subtly wrong, it is unusable.
All three house voices are female. So any male avatar on a default voice is a mismatch. This happened on a real build: seven clips generated, paid for and rendered before anyone played it back.
The Studio now checks the pairing in three places:
On the brand kit page, as soon as you pick either half.
In a video's Settings, under the presenter.
When you press Make presenter clip — a mismatch stops the clip before anything is sent to HeyGen, and the message names both places you can fix it.
It only objects when it is certain. Photo avatars carry no gender at HeyGen, and a voice id pasted by hand may not either; where the gender is unknown, nothing is blocked. It never guesses from a name.
Make the clips
Mark the scenes — set Picture type to Presenter on the scenes that need one, and choose the presenter position.
Record the voice — all of it, before the next step.
Presenter clips — in step 2 of the rail, or Make presenter clip on one scene. The Studio tells you the total seconds and the cost before it starts.
Check for stale clips — any scene whose narration or timing changed after its clip was made is flagged remake clip. Make it again.
Avatar video is the expensive part — roughly $0.10 a second of finished clip. Get the script signed off before you generate clips, not after: changing a line of narration afterwards means paying for that scene's clip twice.
From a PowerPoint or Word file
The three modes decide how much of the client's deck survives.
Mode
What happens
Choose it when
Keep the deck
The slide as it is — the client's text, pictures, icons, tables and colours, at the deck's own proportions.
The deck is approved and must not change. Compliance and policy material.
Keep the deck, fit to the presenter
Same content, re-arranged around the avatar so it stays readable. Groups are re-stacked, never split; tables are never re-flowed.
You want an avatar presenting the client's own slides.
Video-first
Rewritten into the Studio's layouts, with AI pictures and reveals.
The deck is raw material, not the deliverable.
One slide becomes one scene. Keep slide text short — it becomes the on-screen text.
Narration goes in the speaker notes. This is the part people miss.
Optional tags in the notes: [SAY][IMAGE][ICONS][QUIZ].
Missing narration or picture notes are drafted by the writer and flagged, so you can see what was invented.
For Word, use the scene table template — one row per scene, or one scene per heading.
A slide kept from the deck can be swapped to a Studio layout later, one slide at a time, and swapped back. Its narration is untouched either way.
The module shelf
Modules in the top bar, then All modules.
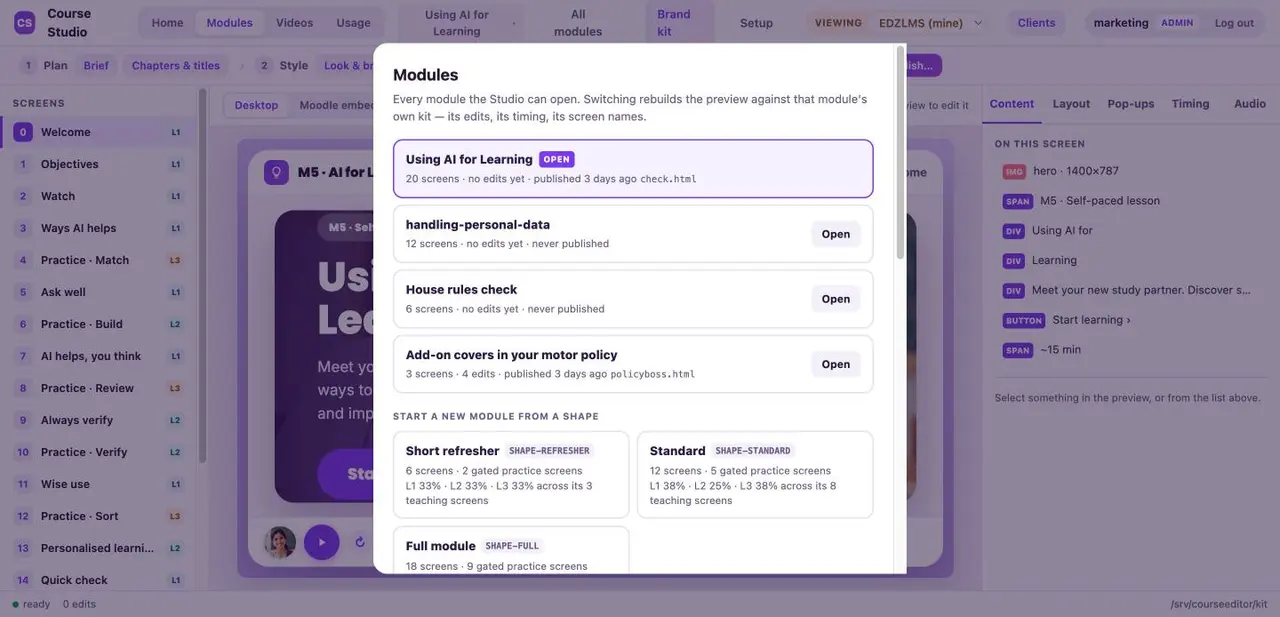
Every module the Studio can open, and four ways to make another.
Start from a shape
A shape is the skeleton: how many screens, where the gated practice screens go, and the mix of difficulty levels. The model fills words into it — it does not get to decide the structure.
The copy on each screen says what belongs there. Replace the words, keep the shape.
The other three ways in
From a script — paste the transcript or whatever the client sent, name it, choose a shape, Generate. What comes back is checked against the skeleton and against the pattern catalogue before anything is written.
From a PowerPoint — the deck becomes the material; the shape decides the teaching, so what comes out is a module, not a slideshow. Every figure survives: a price table is read out row by row with its column names, so a question can be written about a margin. A deck with pictures and almost no words is refused, because a module needs something to teach.
Bring in a published module — drop a SCORM .zip or a standalone .html and it is taken apart into an editable kit: images, narration, cue timing and screen names.
The module editor
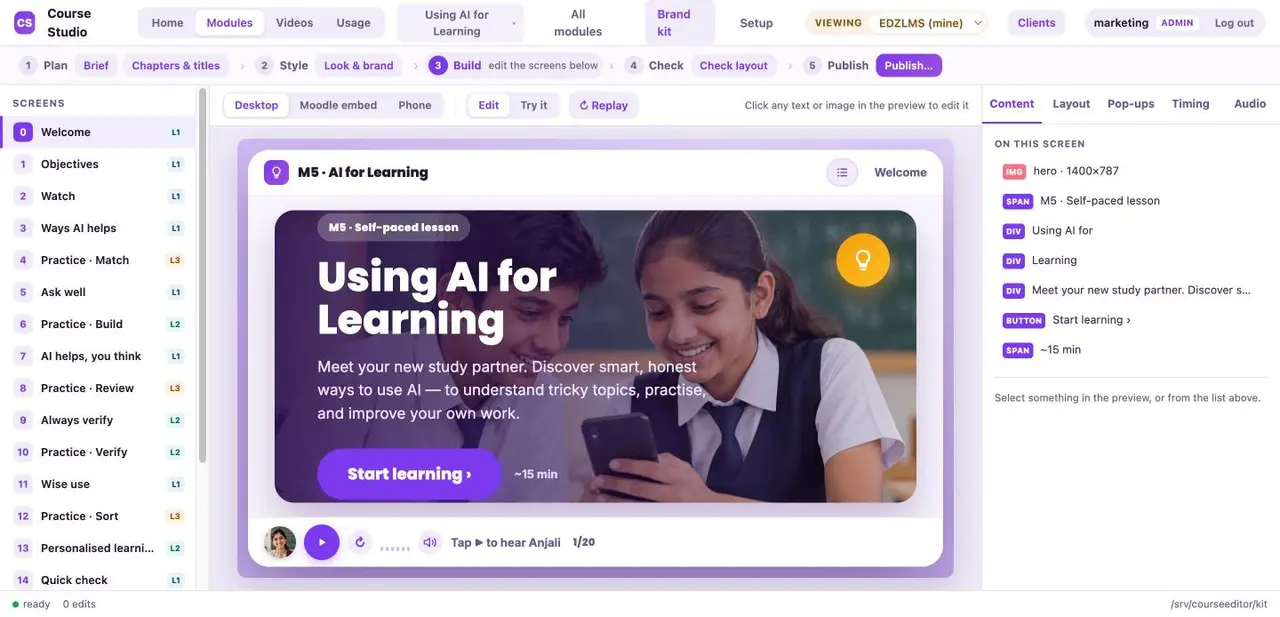
Five steps across the top; the screens down the left with their L1/L2/L3 level; the live module in the middle.
Plan — Brief and Chapters & titles.
Style — Look & brand. Modules take their colours here, not from the video brand kit.
Build — edit the screens. Click any text or image in the preview to edit it. The right-hand panel lists everything on the screen; the tabs are Content, Layout, Pop-ups, Timing and Audio.
Check — Check layout renders every screen and reports anything overflowing, overlapping or unreadable.
Publish — SCORM or a single HTML file.
Above the preview: Desktop / Moodle embed / Phone — check all three, because Moodle's embed is narrower than a browser window and that is where text overflows. Try it runs the screen as a learner would, gates and all; Replay restarts the animation.
A module published by the Studio brings its screen names with it, so edits written against the original still land when you bring it back in. One built before that gets fresh names.
Before you send it out
Read the warnings from the render. Every one.
Play the first fifteen seconds. The title card, the first words, and whether the presenter's mouth matches.
Play the last fifteen seconds. The recap, the logo, and that it ends where it should.
Check every presenter scene for a remake clip flag.
Open the SRT and read it. It is what a deaf learner gets, and it is also what an LMS indexes.
Check the brand: is the client's logo on it, or is ours?
Check the render date on the row you are about to download.
When something looks wrong
What you see
What it is
The presenter's mouth is out of step with the words
The clip was made against an older recording. The scene will be flagged remake clip; make the clip again.
Usually the section card: the first scene of a new part waits two seconds for the card to clear. If you did not want a card, put the scene in the same part as the one before it.
A scene is silent all the way through
Placeholder narration — the voice was never recorded for it. The render warnings say which scenes.
[ CLIENT LOGO ] printed on the title card
No logo has been uploaded. Add one in the brand kit, or in that video's Settings.
White text that is hard to read
A scene is in light mode with a light picture behind it. Change the picture, or the layout.
The avatar picker is empty or spinning
The list is still arriving from HeyGen — about a minute after a restart. It fills itself in.
"no credits remaining"
The provider account, not the Studio. Check the balance on the provider's own site; the Studio falls back to another picture provider where it can, but not for writing or voice.